Example Live Script for TopoToolbox (MATLAB)#
If you have used TopoToolbox to do something cool, we would love to feature your work on our gallery! Creating an example for our gallery can be a great way to share your work with the TopoToolbox community and to get started contributing to the project.
If you are using TopoToolbox from MATLAB, the easiest way to do this is to create a MATLAB Live Script. This Live Script shows you all the components you should have to successfully contribute an example.
Clone the gallery repository and create a new directory under notebooks/matlab to contain your example. This Live Script lives in the notebooks/matlab/contributing directory, for example. Create a new Live Script within that directory and give it a short but descriptive file name (e.g. contributing.mlx). Save your Live Script in the MLX file format, not the newer M file format.
Give your example a descriptive title (e.g. “Example Live Script for TopoToolbox (MATLAB)”) as a first-level heading at the beginning of your script.
Authors#
This notebook is licensed under CC-BY 4.0.
List the names and affiliations of people involved in producing your notebook. If you want to provide contact information or social media links, feel free to do so. Remember the principles of scientific authorship in deciding whom to list.
Normally code in TopoToolbox is licensed under the GPL v3.0, but you may use another license for your notebook if you wish as long as it complies with the licenses of the software you are using and with any other applicable copyright laws.
Highlighted References#
If you have any references you particularly want to highlight – such as a paper that you have recently published using the techniques in your example – list them here. If you have additional references that you you like to cite, you can place them here or at the end of the script.
Audience#
Potential contributors to TopoToolbox
It is a good idea to give a brief statement about who you think would get the most out of your example and what they might need to know to follow along. If you are sharing some educational materials that you have used in a course, for example, share the expected prerequisites of students in your course.
Introduction#
Add an introduction to your example where you describe the problem you are trying to solve. Think about the audience that you listed above and target the level of description to those readers. Don’t spend too much time describing your problem, though. This is meant to showcase your application of TopoToolbox. Get to the code sooner rather than later!
Dependencies#
In addition to TopoToolbox, users can be expected to have a fairly recent MATLAB version and the Image Processing and Mapping Toolboxes installed. List any additional dependencies that users need to run your example here.
If you need additional dependencies to run your example, they will also need to be installed when your Live Script is compiled on our continuous integration server. Open an issue to discuss your needs. Simple scripts or functions can be added to your Live Script’s directory in the gallery repository. When the script is run, its directory is added to the MATLAB path, so you will have access to any code within that directory.
Your Example Here#
The rest of the example is up to you! Use the code and multimedia functionality of Live Scripts to bring your example to life.
Accessing data#
There are currently two easy ways to access data from within TopoToolbox, using the read_example function to load the DEMs that we supply with the software and readopentopo to download data from OpenTopography.
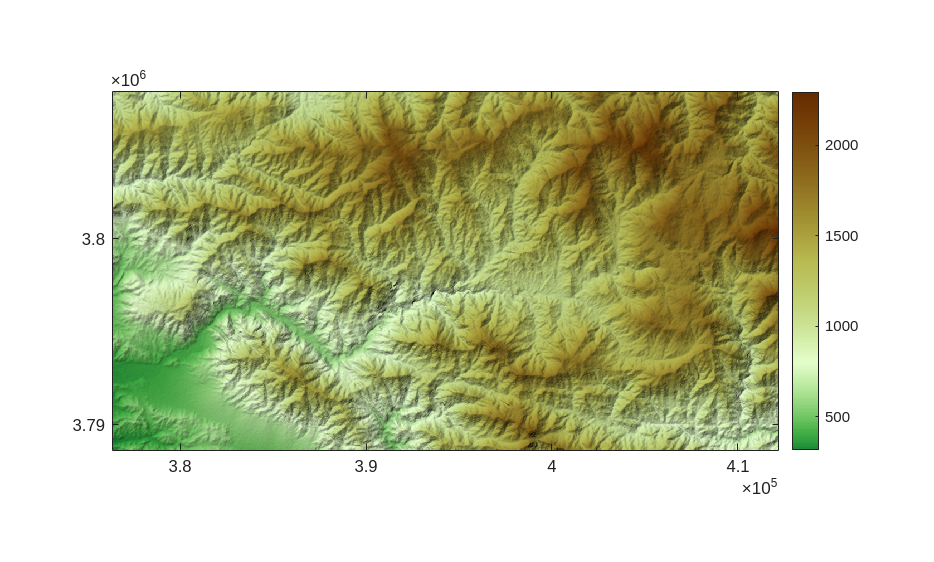
[1]:
DEM1 = readexample('bigtujunga');
imageschs(DEM1,[],'colormap',landcolor);
[1]:
Users will need an API key to download data from OpenTopography. See the help text for the readopentopo function for how users should provide API keys to TopoToolbox. An API key is available in the correct location on our continuous integration system, so your example using readopentopo will compile without specifying one.
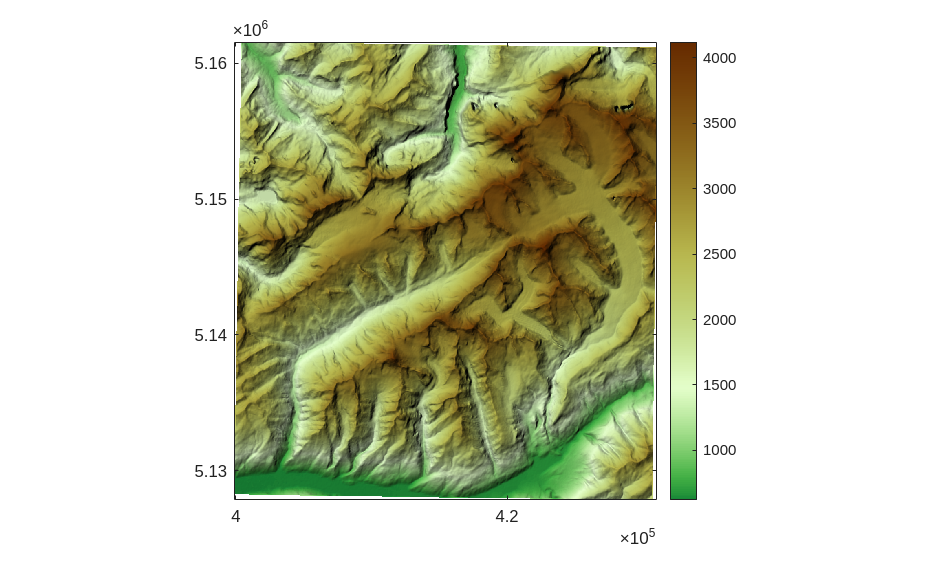
[2]:
DEM2 = readopentopo(north=46.6, south=46.3, west=7.7, east=8.1, demtype='SRTMGL3');
[2]:
The downloaded DEM is not in a projected coordinate system.
Make sure to project the DEM using GRIDobj/project or
GRIDobj/reproject2utm.
[3]:
DEM2 = reproject2utm(DEM2, 30.0)
[3]:
DEM2 =
  GRIDobj with properties:
           Z: [1124x1038 single]
    cellsize: 30
          wf: [2x3 double]
        size: [1124 1038]
        name: ''
       zunit: ''
      xyunit: ''
      georef: [1x1 map.rasterref.MapCellsReference]
[4]:
imageschs(DEM2, [], 'colormap', landcolor);
[4]:
If you can use data from one of these sources to show off your example, please do so: it makes it much easier for users to follow along, and we are unlikely to be able to distribute additional datasets through TopoToolbox.
If you do need external data for your example, you can provide code in your notebook to download the data from a publicly accessible storage location such as a web server or an S3 bucket. If you are struggling to make necessary data available for your example, let us know, and we can work on a solution.
Contributing your Live Script to TopoToolbox#
Once you have developed your notebook, you can submit it to the gallery by making a pull request on GitHub. More information about this process is available on the TopoToolbox website. Please get in touch if you are having trouble!
Make sure before you commit the notebook that you clear all output from the notebook. The notebooks can get quite large when they have images embedded in them. We run the scripts and regenerate all your figures when we publish to our website.
References and Additional Information#
Put any additional references, links and information you need at the end of the notebook.